> ## Documentation Index
> Fetch the complete documentation index at: https://mixpanel-edb78807-tylergoerzen-tof-687-regional-hosts.mintlify.site/llms.txt
> Use this file to discover all available pages before exploring further.
# Install Mixpanel
export const ExtendedButton = ({title, link}) =>
{title}
;
## Overview
Installing Mixpanel is easy. This guide will show you how to do it with our SDKs.
Already collect product data? Connect your [**Data Warehouse**](/docs/tracking-methods/warehouse-connectors) or via [**3rd Party Integrations**](/docs/tracking-methods/integrations/).
## Code
Choose from the methods below. Not sure how to choose? [Read our guide](/docs/tracking-methods/choosing-the-right-method).
Mixpanel supports [EU](/docs/privacy/eu-residency) and [India](/docs/privacy/in-residency) data residency, which you choose per project. If your project uses either, point the SDK at that region's host. Each tab below shows how. Events sent to the wrong region aren't ingested.
##### Install the SDK
```html theme={"system"}
```
```text theme={"system"}
npm install --save mixpanel-browser
```
```text theme={"system"}
yarn add mixpanel-browser
```
##### Configure the SDK
Replace `YOUR_TOKEN` with your project token. You can find your token [here](https://mixpanel.com/settings/project).
You can learn more about configuring Session Replay and Heatmaps [here](/docs/tracking-methods/sdks/javascript/javascript-replay).
```js Javascript theme={"system"}
//Import Mixpanel SDK (only required for npm and yarn)
import mixpanel from "mixpanel-browser";
// Near entry of your product, init Mixpanel
mixpanel.init("YOUR_TOKEN", {
debug: true,
track_pageview: true,
persistence: "localStorage",
record_sessions_percent: 100, //records 100% of all sessions
record_heatmap_data: true,
});
```
US projects use the SDK's default host and need no change. For an EU or India project, set `api_host`:
```js EU theme={"system"}
mixpanel.init("YOUR_TOKEN", {
api_host: "https://api-eu.mixpanel.com",
debug: true,
track_pageview: true,
persistence: "localStorage",
record_sessions_percent: 100, //records 100% of all sessions
record_heatmap_data: true,
});
```
```js India theme={"system"}
mixpanel.init("YOUR_TOKEN", {
api_host: "https://api-in.mixpanel.com",
debug: true,
track_pageview: true,
persistence: "localStorage",
record_sessions_percent: 100, //records 100% of all sessions
record_heatmap_data: true,
});
```
##### Install the SDK
```shell Python theme={"system"}
pip install mixpanel
```
##### Configure the SDK
Replace `YOUR_TOKEN` with your project token. You can find your token [here](https://mixpanel.com/settings/project).
```python Python theme={"system"}
from mixpanel import Mixpanel
mp = Mixpanel("YOUR_TOKEN")
```
US projects use the SDK's default host and need no change. For an EU or India project, pass a `Consumer` with `api_host` set:
```python EU theme={"system"}
from mixpanel import Mixpanel, Consumer
mp = Mixpanel("YOUR_TOKEN", consumer=Consumer(api_host="api-eu.mixpanel.com"))
```
```python India theme={"system"}
from mixpanel import Mixpanel, Consumer
mp = Mixpanel("YOUR_TOKEN", consumer=Consumer(api_host="api-in.mixpanel.com"))
```
##### Install the SDK
**Install with Composer**
1. Add mixpanel/mixpanel-php as a dependency and run composer update:
```shell php theme={"system"}
"require": {
...
"mixpanel/mixpanel-php" : "2.*"
...
}
```
**Install Manually**
1. [Download the Mixpanel PHP Library](https://github.com/mixpanel/mixpanel-php/archive/master.zip)
2. Extract the zip file to a directory called "mixpanel-php" in your project root
##### Configure the SDK
Replace `YOUR_TOKEN` with your project token. You can find your token [here](https://mixpanel.com/settings/project).
```shell php theme={"system"}
```
US projects use the SDK's default host and need no change. For an EU or India project, set the `host` option:
```php EU theme={"system"}
"api-eu.mixpanel.com"
));
?>
```
```php India theme={"system"}
"api-in.mixpanel.com"
));
?>
```
##### Install the SDK
```shell Node.js theme={"system"}
npm install mixpanel
```
##### Configure the SDK
Replace `YOUR_TOKEN` with your project token. You can find your token [here](https://mixpanel.com/settings/project).
```js Node.js theme={"system"}
// Grab the Mixpanel factory
var Mixpanel = require("mixpanel");
// Create an instance of the mixpanel client
var mixpanel = Mixpanel.init("YOUR_TOKEN");
```
US projects use the SDK's default host and need no change. For an EU or India project, set `host`:
```js EU theme={"system"}
var mixpanel = Mixpanel.init("YOUR_TOKEN", {
host: "api-eu.mixpanel.com",
});
```
```js India theme={"system"}
var mixpanel = Mixpanel.init("YOUR_TOKEN", {
host: "api-in.mixpanel.com",
});
```
##### Install the SDK
```shell Go theme={"system"}
go get github.com/mixpanel/mixpanel-go
```
##### Configure the SDK
Replace `YOUR_TOKEN` with your project token. You can find your token [here](https://mixpanel.com/settings/project).
```shell Go theme={"system"}
package main
import (
"context"
"github.com/mixpanel/mixpanel-go"
)
func main() {
ctx := context.Background()
mp := mixpanel.NewApiClient("YOUR_TOKEN")
}
```
US projects use the SDK's default host and need no change. For an EU or India project, pass the matching residency option:
```go EU theme={"system"}
mp := mixpanel.NewApiClient("YOUR_TOKEN", mixpanel.EuResidency())
```
```go India theme={"system"}
mp := mixpanel.NewApiClient("YOUR_TOKEN", mixpanel.InResidency())
```
##### Install the SDK
```shell Ruby theme={"system"}
gem install mixpanel-ruby
```
##### Configure the SDK
Replace `YOUR_TOKEN` with your project token. You can find your token [here](https://mixpanel.com/settings/project).
```ruby Ruby theme={"system"}
require 'mixpanel-ruby'
mp = Mixpanel::Tracker.new(YOUR_TOKEN)
```
US projects use the SDK's default host and need no change. For an EU or India project, send messages through a consumer that uses the regional host:
```ruby EU theme={"system"}
consumer = Mixpanel::Consumer.new(
'https://api-eu.mixpanel.com/track',
'https://api-eu.mixpanel.com/engage',
'https://api-eu.mixpanel.com/groups',
)
mp = Mixpanel::Tracker.new(YOUR_TOKEN) do |type, message|
consumer.send!(type, message)
end
```
```ruby India theme={"system"}
consumer = Mixpanel::Consumer.new(
'https://api-in.mixpanel.com/track',
'https://api-in.mixpanel.com/engage',
'https://api-in.mixpanel.com/groups',
)
mp = Mixpanel::Tracker.new(YOUR_TOKEN) do |type, message|
consumer.send!(type, message)
end
```
##### Install the SDK
```xml Java theme={"system"}
com.mixpanelmixpanel-java1.4.4
```
##### Configure the SDK
Replace `YOUR_TOKEN` with your project token. You can find your token [here](https://mixpanel.com/settings/project).
```java Java theme={"system"}
//Import Mixpanel API
import com.mixpanel.mixpanelapi.MessageBuilder;
import com.mixpanel.mixpanelapi.MixpanelAPI;
// Set up an instance of MixpanelAPI
MixpanelAPI mixpanel = new MixpanelAPI();
MessageBuilder messageBuilder = new MessageBuilder('YOUR_TOKEN');
```
US projects use the SDK's default host and need no change. For an EU or India project, pass the regional endpoints to `MixpanelAPI`:
```java EU theme={"system"}
MixpanelAPI mixpanel = new MixpanelAPI("https://api-eu.mixpanel.com/track",
"https://api-eu.mixpanel.com/engage",
"https://api-eu.mixpanel.com/groups");
```
```java India theme={"system"}
MixpanelAPI mixpanel = new MixpanelAPI("https://api-in.mixpanel.com/track",
"https://api-in.mixpanel.com/engage",
"https://api-in.mixpanel.com/groups");
```
##### Install the SDK
Under your app's root directory, run:
```sh theme={"system"}
npm install mixpanel-react-native
```
Under your application's iOS folder, run:
```sh theme={"system"}
pod install
```
Note: For XCode 12.5+, there is a known compile issue, please refer to this [workaround](https://github.com/mixpanel/mixpanel-react-native/issues/43#issuecomment-829599732).
##### Configure the SDK
Replace `YOUR_TOKEN` with your project token. You can find your token [here](https://mixpanel.com/settings/project).
```javascript theme={"system"}
//Import Mixpanel API
import { Mixpanel } from "mixpanel-react-native";
// Set up an instance of Mixpanel
const trackAutomaticEvents = false;
const mixpanel = new Mixpanel("YOUR_TOKEN", trackAutomaticEvents);
mixpanel.init();
```
US projects use the SDK's default host and need no change. For an EU or India project, pass the regional host as the third argument to `init()`:
```javascript EU theme={"system"}
mixpanel.init(false, {}, "https://api-eu.mixpanel.com");
```
```javascript India theme={"system"}
mixpanel.init(false, {}, "https://api-in.mixpanel.com");
```
##### Install the SDK
Add `mixpanel_flutter: ^2.0.0` to your package's pubspec.yaml file and run:
```sh theme={"system"}
flutter pub get
```
##### Configure the SDK
Replace `YOUR_TOKEN` with your project token. You can find your token [here](https://mixpanel.com/settings/project).
```dart theme={"system"}
import 'package:mixpanel_flutter/mixpanel_flutter.dart';
class _YourClassState extends State {
Mixpanel mixpanel;
@override
void initState() {
super.initState();
initMixpanel();
}
Future initMixpanel() async {
// Once you've called this method once, you can access `mixpanel` throughout the rest of your application.
mixpanel = await Mixpanel.init("YOUR_TOKEN", trackAutomaticEvents: false);
}
}
```
US projects use the SDK's default host and need no change. For an EU or India project, pass `serverURL`:
```dart EU theme={"system"}
mixpanel = await Mixpanel.init(
"YOUR_TOKEN",
trackAutomaticEvents: false,
serverURL: "https://api-eu.mixpanel.com",
);
```
```dart India theme={"system"}
mixpanel = await Mixpanel.init(
"YOUR_TOKEN",
trackAutomaticEvents: false,
serverURL: "https://api-in.mixpanel.com",
);
```
##### Install the SDK
Note: Swift Package Manager requires Xcode 12+ 1. In Xcode, select File > Swift Packages > Add Package Dependency. 2. Follow the prompts using the URL for this repository and must select a version greater than or equal to v4.0.0
1. Create a Podfile in your Xcode project directory by running `pod init` in your terminal, edit the Podfile generated, and add the following line: `pod
'Mixpanel'`. 2. Run `pod install` in your Xcode project directory. CocoaPods should download and install the Mixpanel library, and create a new Xcode workspace. Open up this workspace in Xcode or typing `open *.xcworkspace` in your terminal.
Add `github "mixpanel/mixpanel-iphone"` to your Cartfile.
##### Configure the SDK
Replace `YOUR_TOKEN` with your project token. You can find your token [here](https://mixpanel.com/settings/project).
```objc theme={"system"}
#import "Mixpanel/Mixpanel.h"
- (BOOL)application:(UIApplication _)application
didFinishLaunchingWithOptions:(NSDictionary _)launchOptions {
...
Mixpanel \*mixpanel = [Mixpanel sharedInstanceWithToken:@"YOUR_TOKEN"
trackAutomaticEvents: NO];
...
}
```
US projects use the SDK's default host and need no change. For an EU or India project, set `serverURL` after initialization:
```objc EU theme={"system"}
mixpanel.serverURL = @"https://api-eu.mixpanel.com";
```
```objc India theme={"system"}
mixpanel.serverURL = @"https://api-in.mixpanel.com";
```
##### Install the SDK
Note: Swift Package Manager requires Xcode 12+
1. In Xcode, select File > Swift Packages > Add Package Dependency.
2. Paste the URL `https://github.com/mixpanel/mixpanel-swift` and a minimum semantic version of v2.8.0.
1. Create a Podfile in your Xcode project directory by running `pod init` in your terminal, edit the Podfile generated, and add the following line: `pod 'Mixpanel-swift'`.
2. Run `pod install` in your Xcode project directory. CocoaPods should download and install the Mixpanel library, and create a new Xcode workspace. Open up this workspace in Xcode or typing `open *.xcworkspace` in your terminal.
Add `github "mixpanel/mixpanel-swift"` to your Cartfile.
##### Configure the SDK
1. Import Mixpanel into `AppDelegate.swift`
2. Initialize Mixpanel within `application:didFinishLaunchingWithOptions` as seen below
Replace `YOUR_TOKEN` with your project token. You can find your token [here](https://mixpanel.com/settings/project).
```swift theme={"system"}
import Mixpanel
func application(_ application: UIApplication,
didFinishLaunchingWithOptions launchOptions: [NSObject: AnyObject]?) -> Bool {
...
// Replace with your Project Token
Mixpanel.initialize(token: "YOUR_TOKEN", trackAutomaticEvents: false)
...
}
```
US projects use the SDK's default host and need no change. For an EU or India project, set `serverURL` in `MixpanelOptions`:
```swift EU theme={"system"}
let options = MixpanelOptions(
token: "YOUR_TOKEN",
serverURL: "https://api-eu.mixpanel.com"
)
Mixpanel.initialize(options: options)
```
```swift India theme={"system"}
let options = MixpanelOptions(
token: "YOUR_TOKEN",
serverURL: "https://api-in.mixpanel.com"
)
Mixpanel.initialize(options: options)
```
##### Install the SDK
Add `implementation 'com.mixpanel.android:mixpanel-android:7.+'` as a dependency to your `build.gradle` file.
Once you've updated `build.gradle`, you can force Android Studio to sync with your new configuration by clicking the Sync Project with Gradle Files icon at the top of the window:
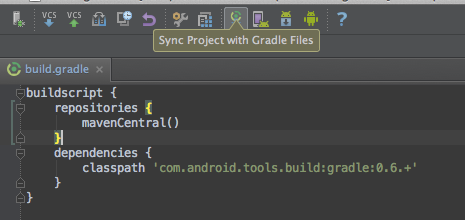
If it cannot find the dependency, you should make sure you've specified `mavenCentral()` as a repository in `build.gradle`.
Next, add the following permissions in your AndroidManifest.xml:
```java theme={"system"}
```
##### Configure the SDK
Replace `YOUR_TOKEN` with your project token. You can find your token [here](https://mixpanel.com/settings/project).
```java theme={"system"}
import com.mixpanel.android.mpmetrics.MixpanelAPI;
public class MainActivity extends ActionBarActivity {
private MixpanelAPI mp;
@Override
protected void onCreate(Bundle savedInstanceState) {
super.onCreate(savedInstanceState);
setContentView(R.layout.activity_main);
trackAutomaticEvents = false;
// Replace with your Project Token
mp = MixpanelAPI.getInstance(this, "YOUR_TOKEN", trackAutomaticEvents);
}
}
```
US projects use the SDK's default host and need no change. For an EU or India project, set `serverURL` with `MixpanelOptions`:
```java EU theme={"system"}
MixpanelOptions options = new MixpanelOptions.Builder()
.serverURL("https://api-eu.mixpanel.com")
.build();
mp = MixpanelAPI.getInstance(this, "YOUR_TOKEN", trackAutomaticEvents, options);
```
```java India theme={"system"}
MixpanelOptions options = new MixpanelOptions.Builder()
.serverURL("https://api-in.mixpanel.com")
.build();
mp = MixpanelAPI.getInstance(this, "YOUR_TOKEN", trackAutomaticEvents, options);
```
##### Install the SDK
Add `https://github.com/mixpanel/mixpanel-unity.git#master` to the dependencies section of `com.mixpanel.unity`.
Alternatively, you can download and install the .unitypackage file from our [releases page](https://github.com/mixpanel/mixpanel-unity/releases).
##### Configure the SDK
To initialize the library, first open the unity project settings menu for Mixpanel. (Edit -> Project Settings -> Mixpanel) Then, enter your project token into the Token and Debug Token input fields within the inspector. You can find your token [here](https://mixpanel.com/settings/project).
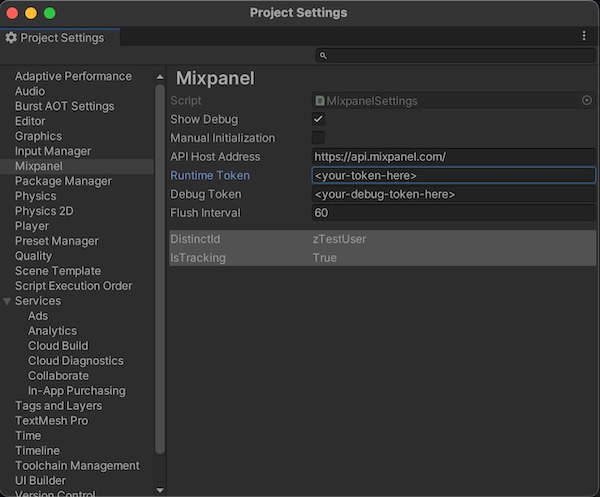
US projects use the SDK's default host and need no change. For an EU or India project, set **API Host Address** in the same settings menu to `https://api-eu.mixpanel.com/` or `https://api-in.mixpanel.com/`.
Note: If you prefer to initialize Mixpanel manually, you can select the `Manual Initialization` in the settings and call `Mixpanel.Init()` to initialize.
To use mixpanel, add the following sample code to a part of your application:
```csharp theme={"system"}
using mixpanel;
```
You're
##### Install the SDK
No install required
Using the HTTP API does not require an installation. **You're ready to move to the next step.**
For an EU or India project, send [Ingestion API](/reference/ingestion-api) requests to `api-eu.mixpanel.com` or `api-in.mixpanel.com` instead of `api.mixpanel.com`.
# Integration / Framework Guides
Next: Identify Your Users
With Mixpanel installed, you’re now ready to identify the users who use
your product.
## FAQ
Yes, if you pass `track_pageview: true` in the `mixpanel.init()` call, Mixpanel will automatically track a "Page View" event every time a new page is loaded. Learn more [here](/docs/tracking-methods/sdks/javascript#tracking-page-views).
When tracking on web, we recommend using localStorage, as this is more reliable:
```javascript theme={"system"}
mixpanel.set_config({ persistence: "localStorage" });
```
Please note that cross-subdomain tracking is not possible when using local storage. If your implementation requires cross-subdomain tracking, remove the persistence flag and use the default "cookie" persistence option.
No, our Mixpanel JavaScript SDK does not set or use any third-party cookies. If you wish to disable cookies entirely, you can set the disable\_persistence option to true when initializing your Mixpanel JS instance. Note that disabling persistence will disable the use of super properties and anonymous -> identified user tracking.
If a user opts out of tracking, you can call the `.optOutTracking()` method on any of our client-side SDKs; this prevents any subsequent data being tracked from that user's device. Learn more [here](/docs/privacy/protecting-user-data).
For iOS specifically: Mixpanel does not use IDFA, so it does not require user permission through the AppTrackingTransparency(ATT) framework. For more details, refer to our [Apple App Developer Privacy Guidance](https://mixpanel.com/legal/app-store-privacy-details).